Using the Google Cloud Services Connector
The Google Cloud Services Connector allows you to access your Google Cloud Storage directly from Altair AI Studio, or query data that you have stored in Google BigQuery (the latter requires the ![]() In-Database Processing Extension, which you can download from the Marketplace)
In-Database Processing Extension, which you can download from the Marketplace)
For Google Cloud Storage, both read and write operations are supported. You can also read from a set of files in a Google Cloud Storage directory, using the ![]() Loop Google Storage operator. This document will walk you through how to:
Loop Google Storage operator. This document will walk you through how to:
- Connect to your Google Cloud Storage account
- Workload Identity Federation
- Using Google Picker
- Read from Google Cloud Storage
Connect to your Google Cloud Storage account
Altair’s use and transfer of information received from Google APIs to any other app will adhere to Google API Services User Data Policy, including the Limited Use requirements.
Before you can use the Google Cloud Storage connector, you have to configure a new Google Cloud Services Connection. For this purpose, you will need the connection details of your account. This includes a project ID and either an access token, or a private key for a service account.
In Altair AI Studio, right-click on the repository you want to store your Google Cloud Services Connection in and choose
 Create Connection.
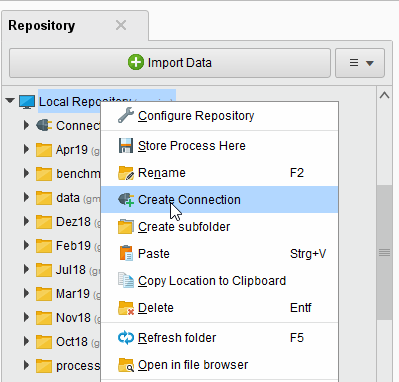
You can also click on Connections > Create Connection
and select the repository from the dropdown of the following dialog.Give a name to the new Connection, set Connection Type to
 Google Cloud Services, then click
  Create:
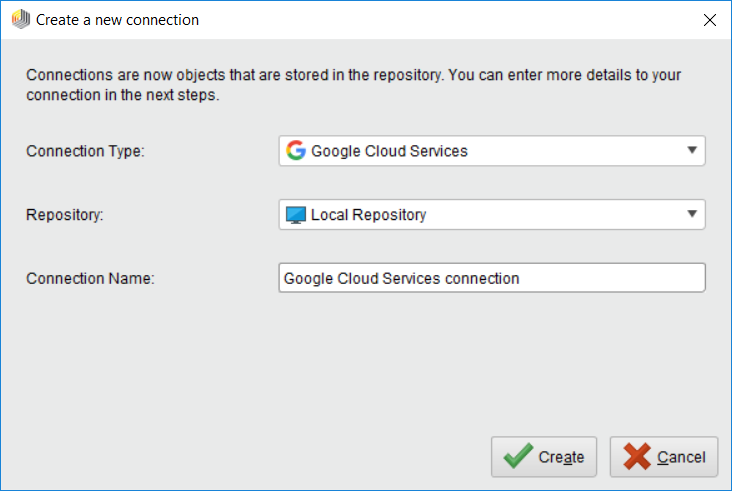
On the Setup tab, fill in the connection details of your Google Cloud account. You have three alternative options for that, see the next steps for details.
You may use an access token that you get after giving access to your Google Cloud account on a consent screen. This is the default option that you see selected as Authorization Protocol. Leave User Account checked and follow the steps below.
To the right of the Access Token field, click the
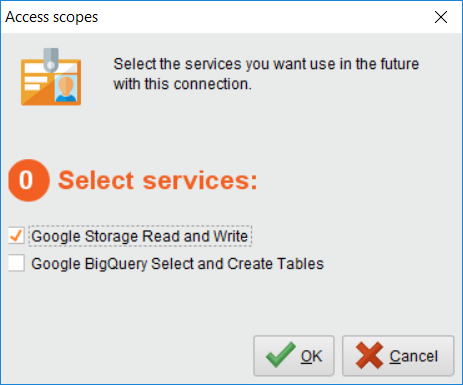
 button to select services a.k.a. access scopes to be used with the access token.
Select the services you would like to use with this connection. If you plan to use Google Drive files, make sure to select the Google Drive API here and also, please read carefully the text in bold letters at the top of the dialog and click on the provided link to grant access to the files you want to use. Detailed info in the Using Google Picker section below.
Click on Request access token
 to open the Google website in your browser. If you are not already logged into your Google Cloud account, you will have to do so now. You can manually copy the URL by clicking on Show URL instead.
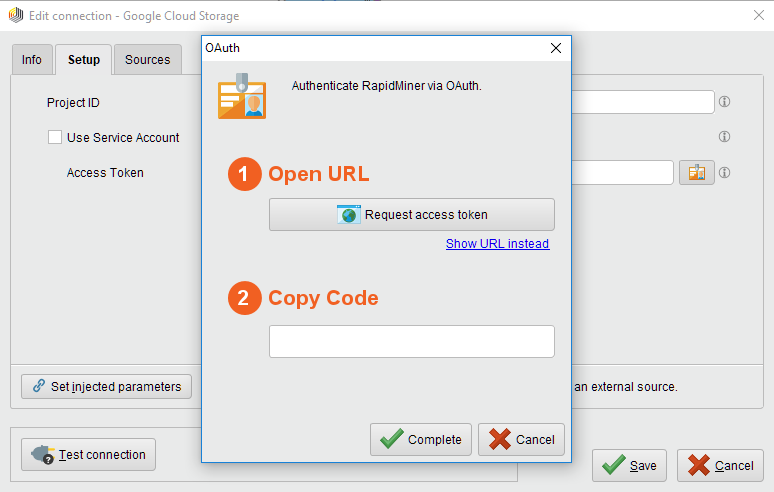
Click Allow to give access to your Google Cloud account and to generate a token. This will bring you to a page where you can see the code to finish the authorization flow. Copy the code shown on the screen.
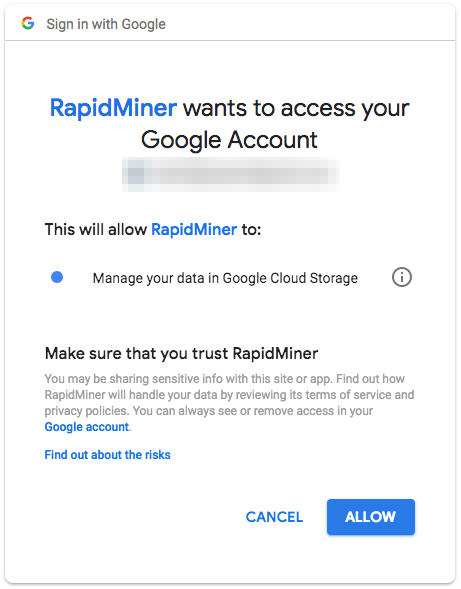
Return to Altair AI Studio, enter the authorization code, and click
Complete: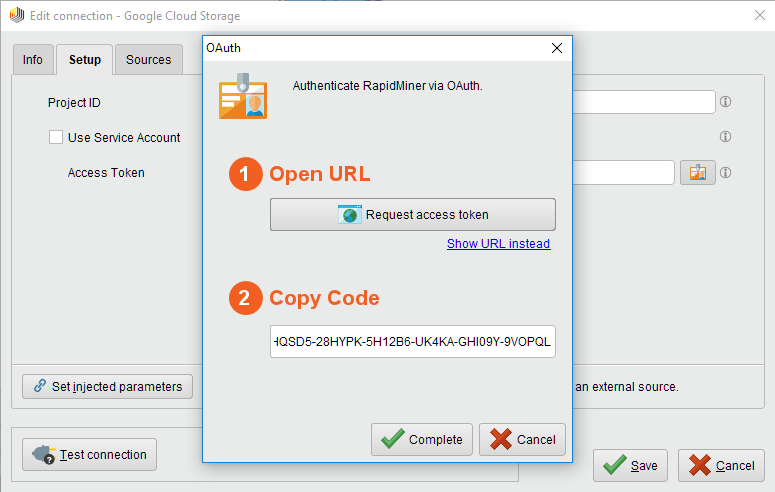
Specify the Project ID for the Connection as well.
Alternatively, you may set up a Service account for your project. In this case, check Service Account radio button and follow the steps below.
After setting up the Service account, create and download a JSON key for it. Use the file chooser button
 next to the Private Key File Content field to select the JSON file containing the key.
Alternatively you can paste the entire JSON file content (e.g. using a text editor and the clipboard) into the Private Key File Content field.
next to the Private Key File Content field to select the JSON file containing the key.
Alternatively you can paste the entire JSON file content (e.g. using a text editor and the clipboard) into the Private Key File Content field.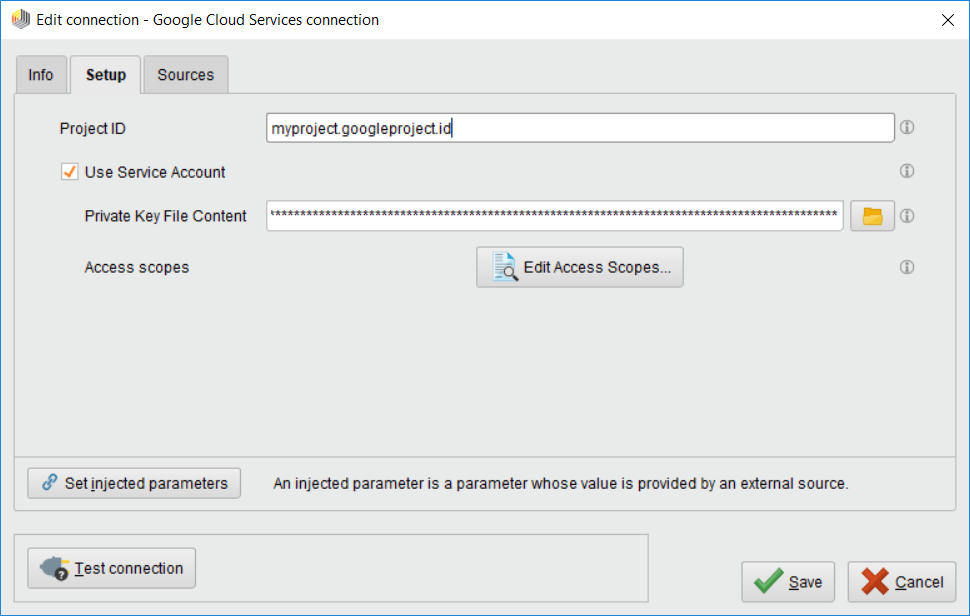
Click the
 Edit Access Scopes... button and select the services you would like to use with this connection.
We have added support for Google's Domain-Wide Delegation. If you want to use this feature, please provide the Delegated Account (Drive) parameter with the email of the user you want to impersonate. Make sure that the service account has been granted Domain-Wide Delegation in Google Cloud Console and has the necessary OAuth scopes assigned.
Specify the Project ID for the Connection as well.
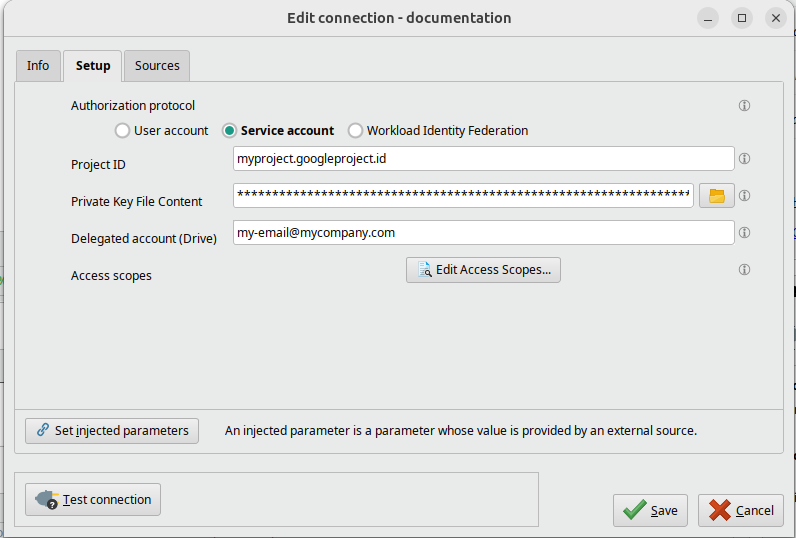
Finally, you can also set up a connection using Workload Identity Federation. In this case, check Workload Identity Federation radio button and follow the steps in the Workload Identity Federation section to configure the connection.
While not required, we recommend testing your new Google Cloud Services Connection by clicking on the
 Test connection button.
If the test fails, please check whether the details are correct. Please note that if you have multiple Google Cloud services selected for this connection, the test will succeed if we can establish a successful connection to at least one of the selected services.
Test connection button.
If the test fails, please check whether the details are correct. Please note that if you have multiple Google Cloud services selected for this connection, the test will succeed if we can establish a successful connection to at least one of the selected services.Click
Save to save your Connection and close the Edit connection dialog. You can now start using the Google Cloud Storage operators.
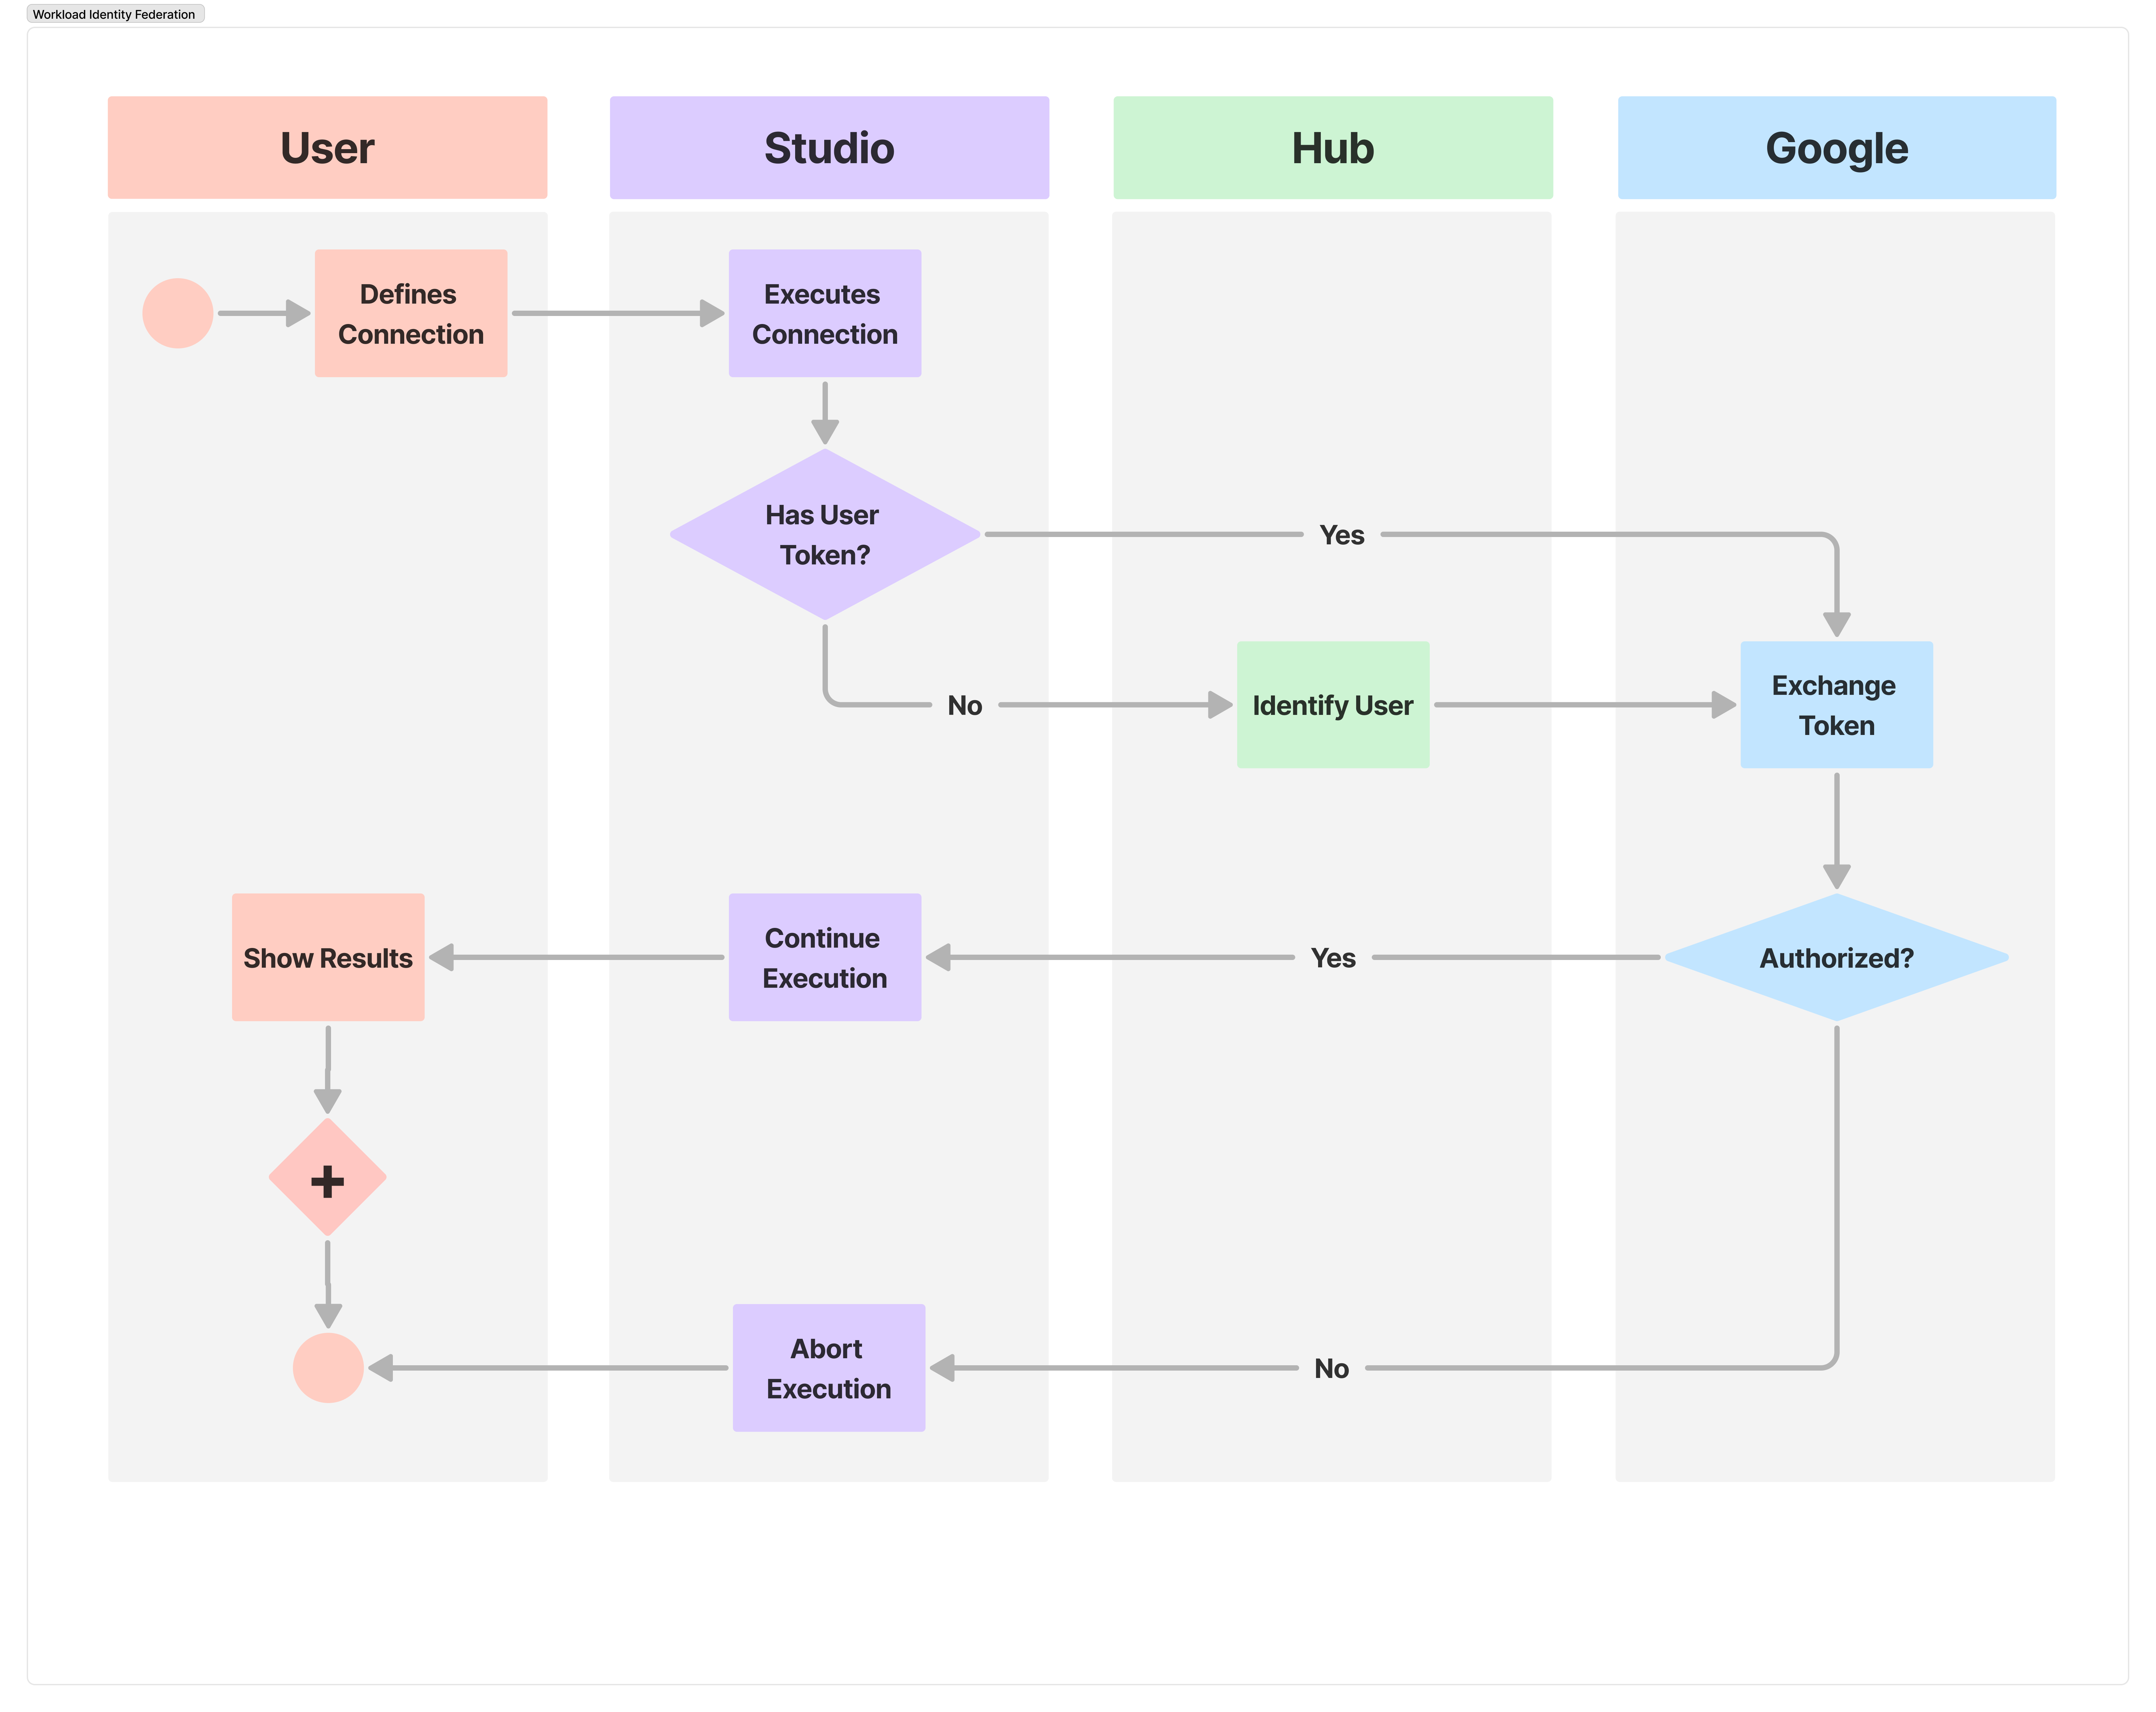
Workload Identity Federation
Workload Identity Federation is a secure authentication method that allows software workloads to access cloud resources without using long-lived service account keys. It works by trusting an external identity provider (IdP), like KeyCloak, to issue short-lived tokens that are exchanged for cloud-native access tokens to call APIs. This eliminates the security risks associated with managing and rotating static credentials, and allows for more granular, application-level access control across different environments, including multi-cloud and hybrid clouds.
Workload Identity Federation is available only when using AI Hub with AI Studio, as it requires an external Identity Provider. AI Hub integrates KeyCloak as its IdP to facilitate this authentication flow.
Configure Google Cloud
The following steps should be completed in Google Cloud:
Open the Google Cloud Console and select the Project you want to configure AI Cloud with. Note the Project ID, as you'll need that when configuring your AI Studio connection.
Create a new Service Account. Don’t forget to grant access to Google Storage and/or BigQuery.
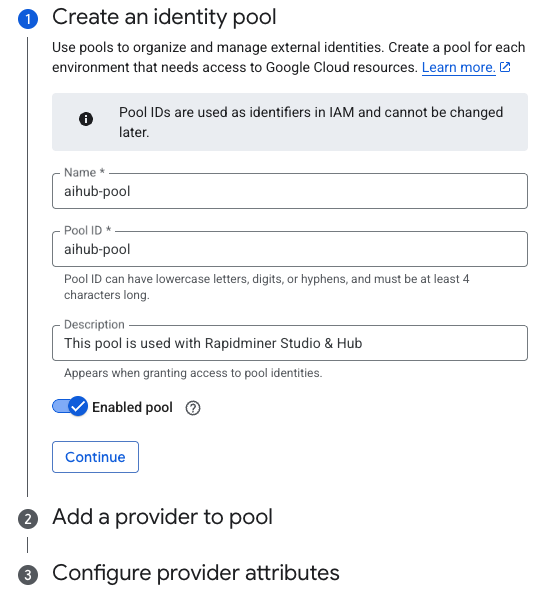
Navigate to IAM & Admin > Workload Identity Federation to create a new Identity Pool and click Create Pool.
Configure a Name and Pool ID and hit Continue.
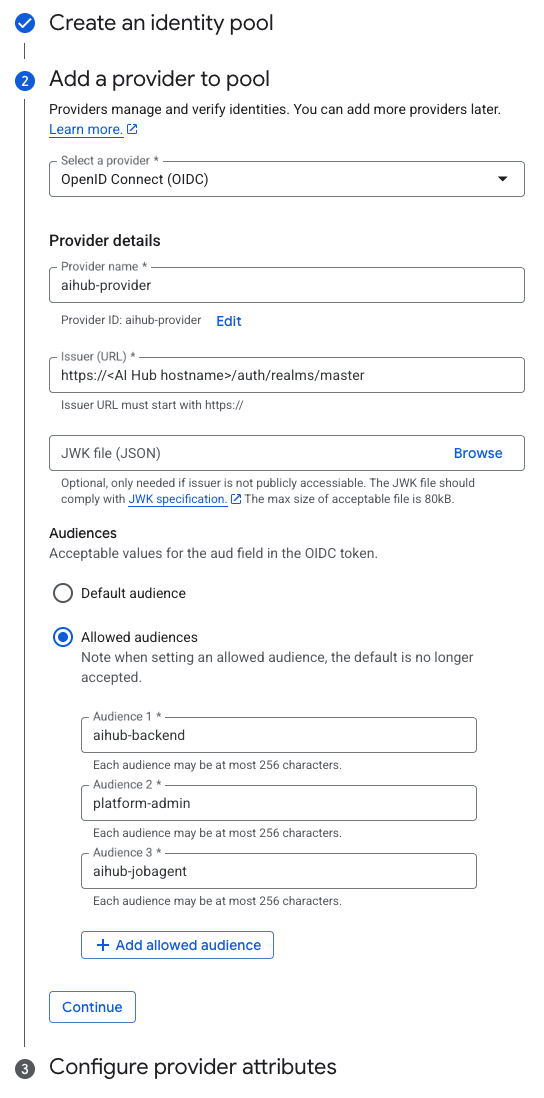
Setup a Provider for your Identity Pool.
Set OpenID Connect (OIDC) as a Provider.
Set a Name for your provider.
The issuer URL is something like this:
https://<AI Hub hostname>/auth/realms/master.If your AI Hub instance is not accessible via GCP, you must setup a JWK file too. You can download the JWK file from AI Hub's KeyCloak via visting the
https://<AI Hub hostname>/auth/realms/master/protocol/openid-connect/certsURL.Switch the Audiences selector to Allowed audience (Default audience is not supported), set the following audiences and hit Continue:
aihub-backendplatform-adminaihub-jobagent
Credentials can include attributes that provide information about an identity. You can use attribute mapping to grant access to a subset of identities. You can learn more about identity mapping in the Google Cloud documentation. Configure provider attribute mappings something like this:
google.subject→assertion.emailand press Save.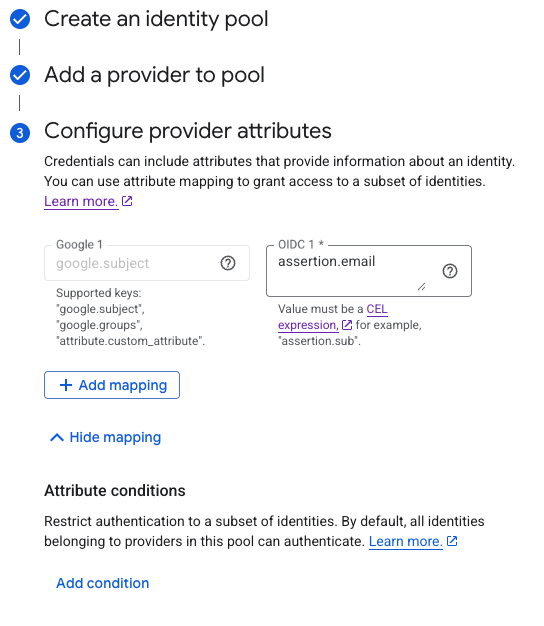
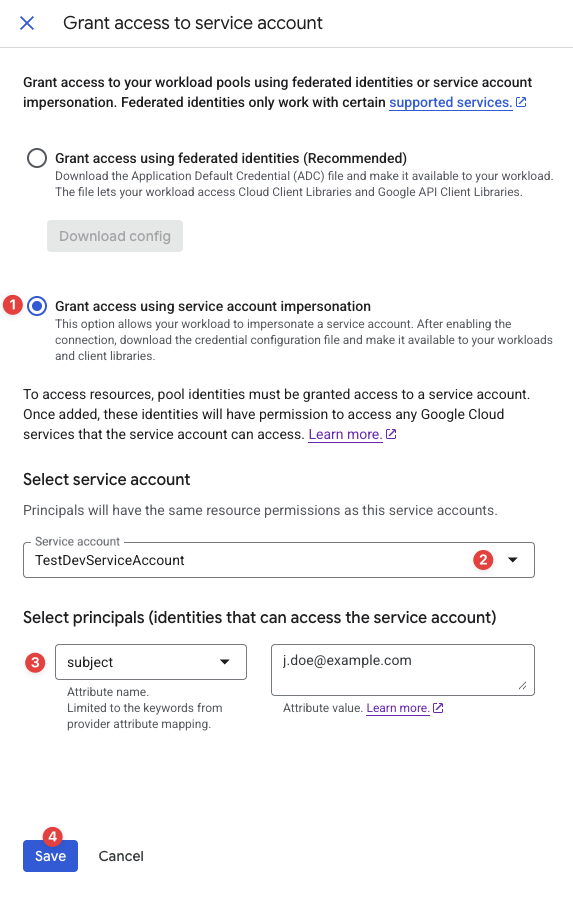
You will need to configure which users can impersonate the service account. Open the Identity Pool and press the Grant Access button.
Select Grant access using service account impersonation.
Browse for the service account you previously created.
Configure the attribute name and value. Attribute names are limited to the keywords from provider attribute mapping. Learn more about attribute value configuration in Google Cloud documentation
Press Save.
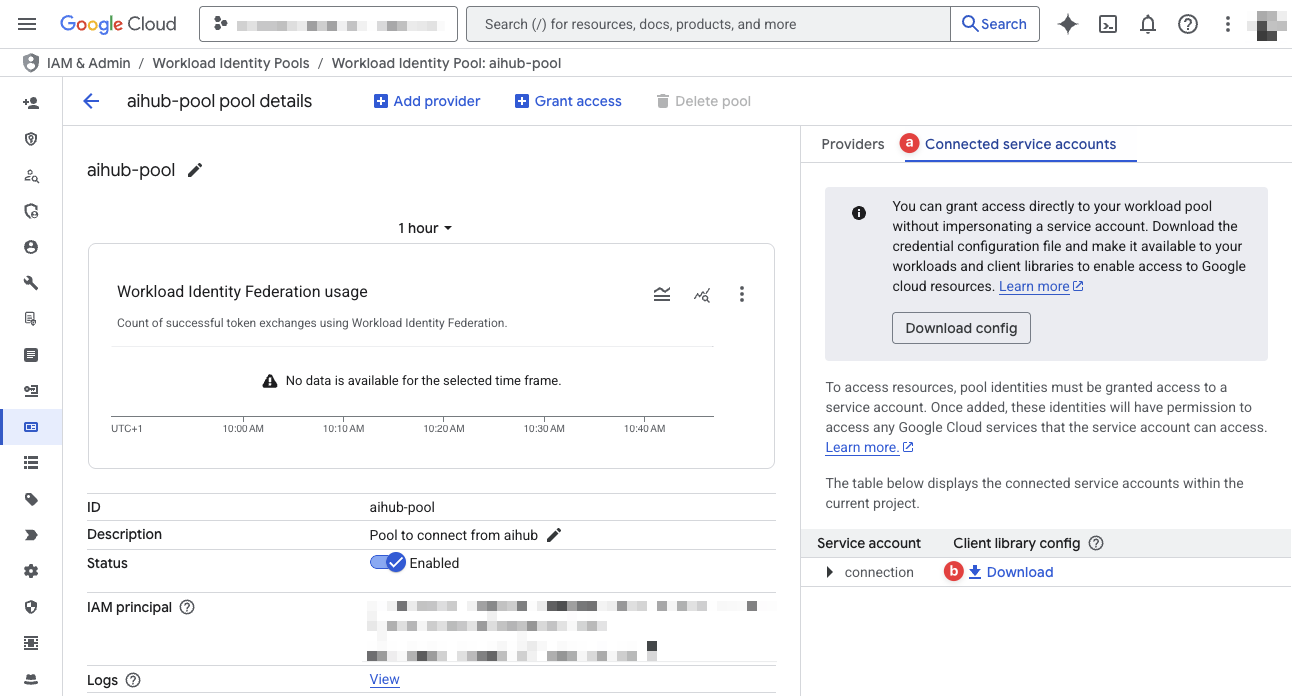
You'll need the Client Library Config to setup AI Studio. It can be downloaded by visiting the Connected service accounts tab (a) and clicking the Download button (b) in the Client library config column.
Select your Provider.
Insert random text into the OIDC ID token path field. It's a mandatory field, but it's content is immaterial.
Format:
jsonPress DOWNLOAD CONFIG.
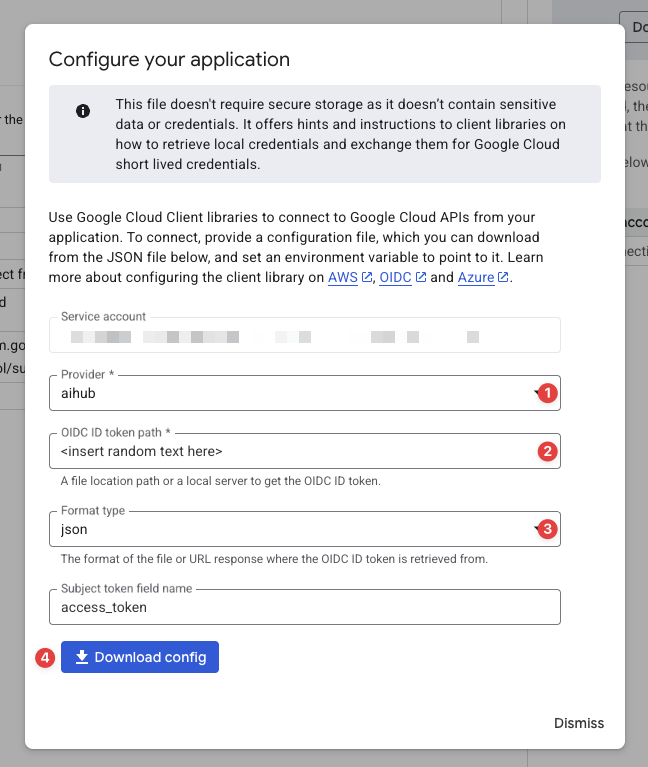
The config file will look something like this:
 {
   "universe_domain": "googleapis.com",
   "type": "external_account",
   "audience": "[redacted]",
   "subject_token_type": "urn:ietf:params:oauth:token-type:jwt",
   "token_url": "https://sts.googleapis.com/v1/token",
   "service_account_impersonation_url": "[redacted]",
   "credential_source": {
     "file": "random-text",
     "format": {
     "type": "json",
       "subject_token_field_name": "access_token"
     }
   }
 }
Configure AI Studio
Google Cloud Storage connections using Workload Identity Federation can only be configured in projects synchronized with AI Hub.
Create a new Google Cloud Services connection in your AI Hub connected project and configure it as follows:
Set the Authorization protocol to Workload Identity Federation.
The Project ID is your Google Cloud project's identifier.
Copy the value of the
audiencekey from the Client Library Config to the Audience field.Copy the value of the
service_account_impersonation_urlkey from the Client Library Config to the Impersonation URL field.Set the Token Type to
JWT.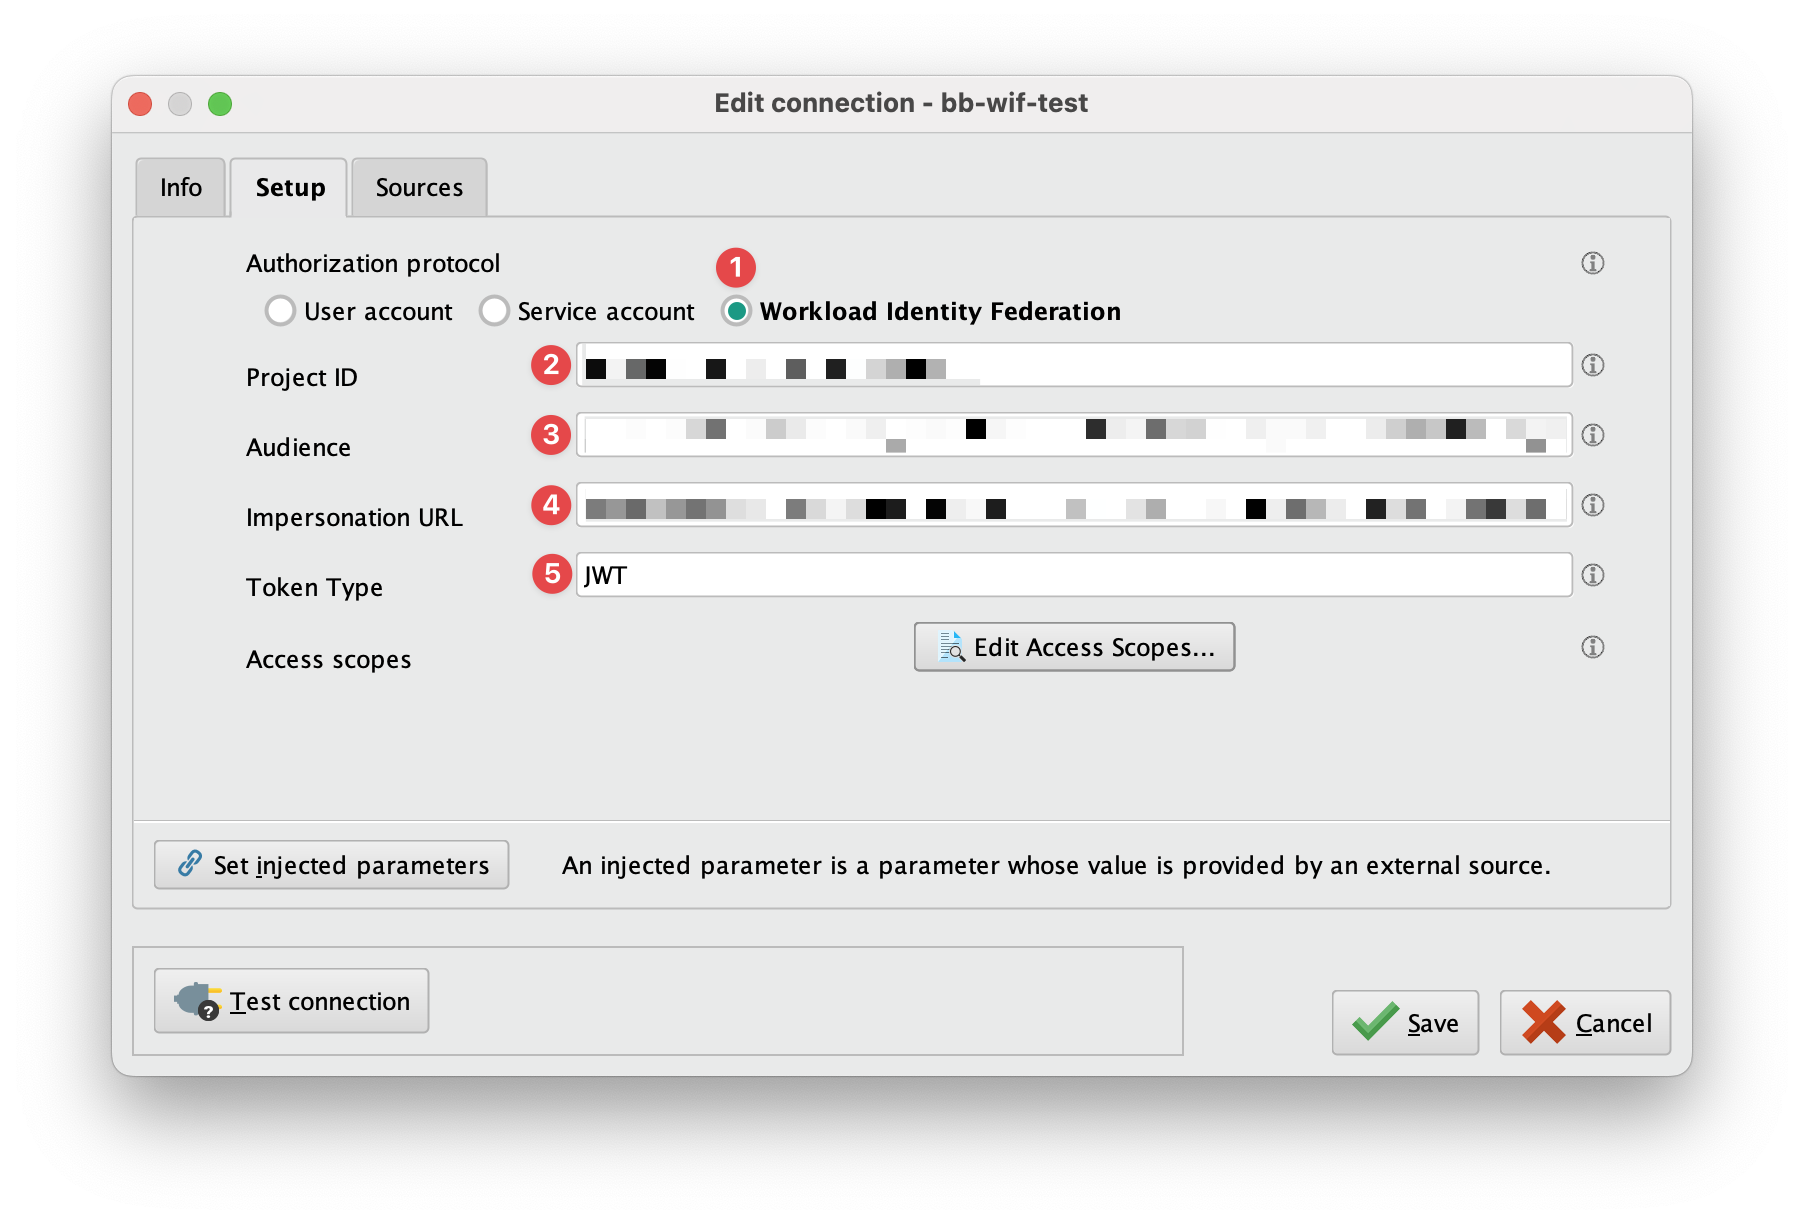
Click the
Edit Access Scopes... button and select the services you would like to use with this connection. If you have installed the  In-Database Processing Extension, Google BigQuery will show up here as an option.
Create a Snapshot and upload the new connection to AI Hub.
Using Google Picker
When using the
 Google Drive or Google Sheets operators, you need to allow AI Studio to access your files using the Google Picker API. For that, in the scope selection screen as well as in all related operators there's a link to open the Google Picker interface.
Clicking on that link will open a browser window where you can log in using your Google account and select the files and folders you want to use from AI Studio.

After clicking Authorize you will be requested to log in user the same Google account you want to use to share files with AI Studio.
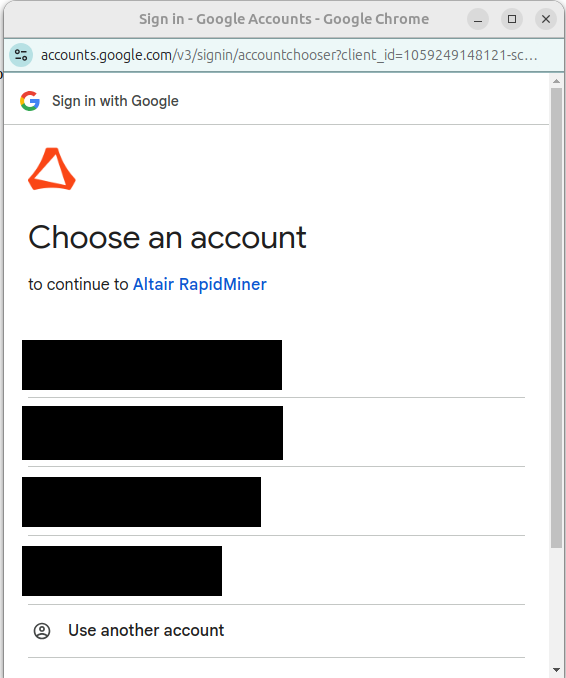
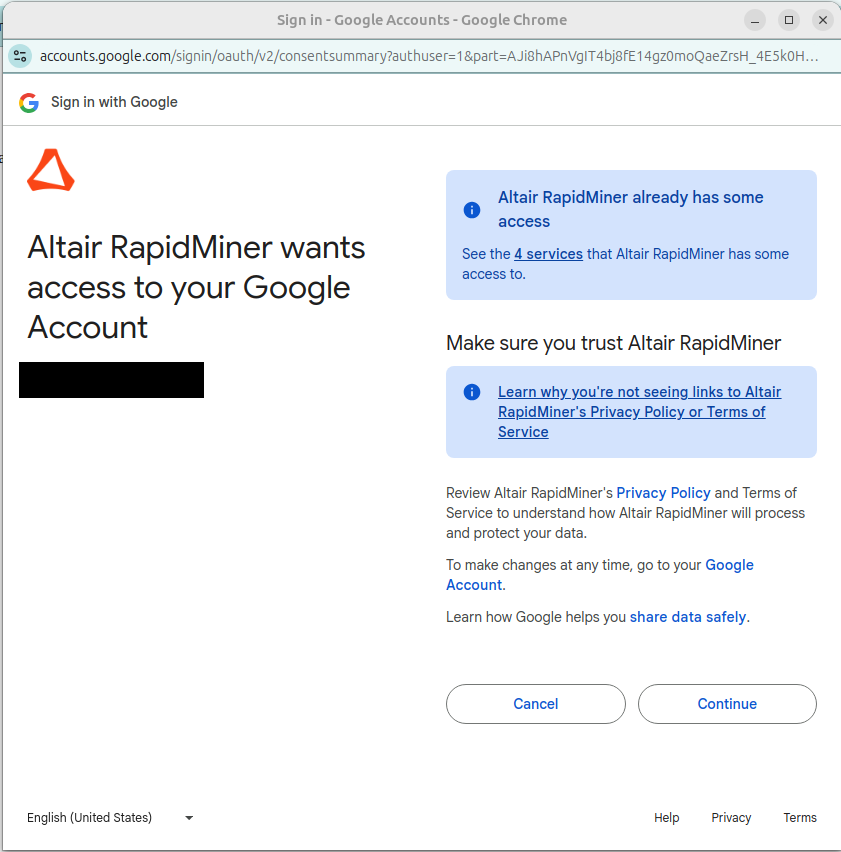
After logging in, you will be presented with a disclaimer screen from Google explaining what AI Studio will be able to do with your files. Click Continue to proceed.
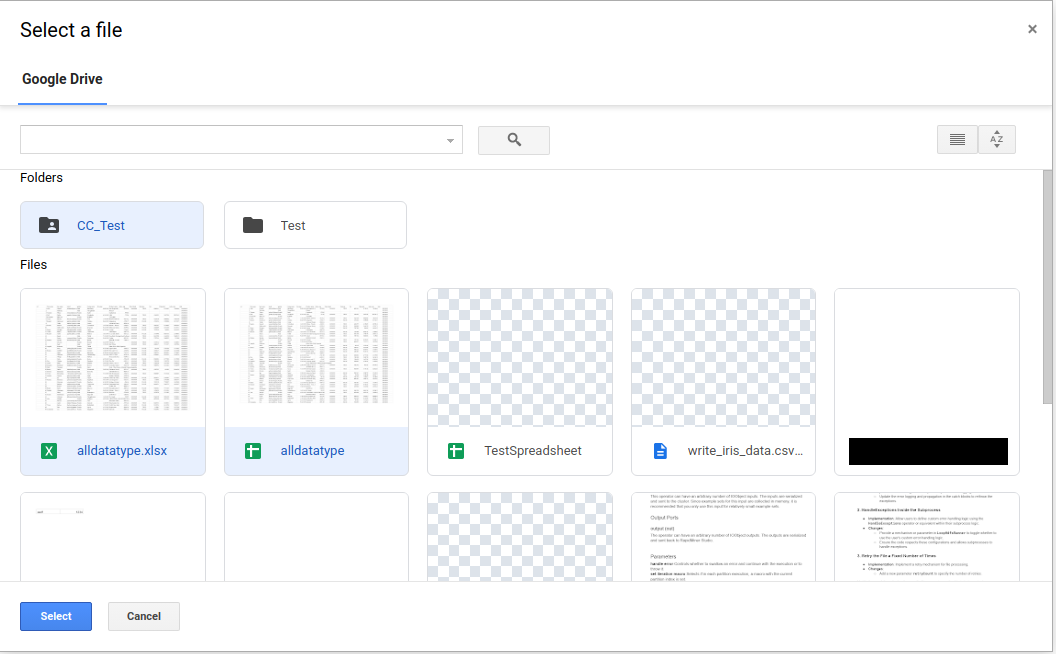
Now, you will be able to select the files and folders you want to share with AI Studio. Please bear in mind that you need to also select folders to be able to write your work back to Google Drive, but folder selection does not mean files inside them are selected. After selecting them, click Select to confirm your selection.
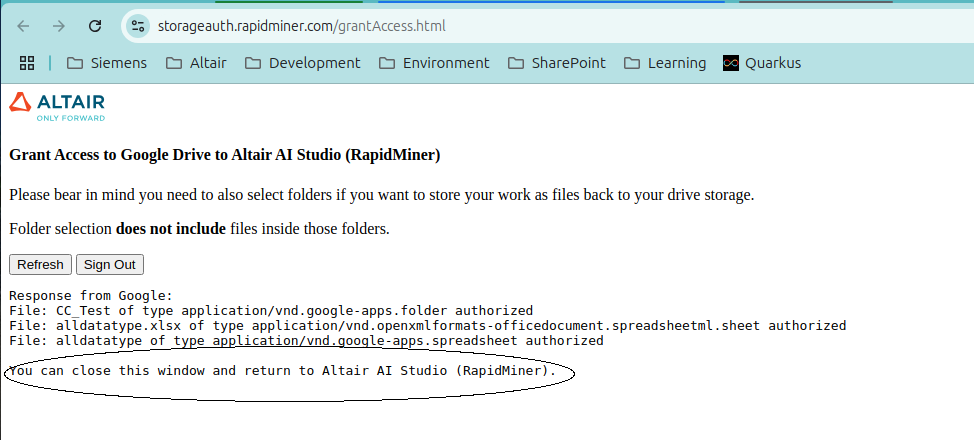
Finally, you will be presented with a confirmation screen in which you will see the selected files and folders. Click Logout or close the tab browser to finish the process.
Proceed with the connection or operator configuration in AI Studio. The files and folders you selected will now be available to use.
Read from Google Cloud Storage
The ![]() Read Google Storage operator reads data from your Google Cloud Storage account.
The operator can be used to load arbitrary file formats, since it only downloads and does not process the files.
To process the files you will need to use additional operators such as Read CSV, Read Excel, or Read XML.
Read Google Storage operator reads data from your Google Cloud Storage account.
The operator can be used to load arbitrary file formats, since it only downloads and does not process the files.
To process the files you will need to use additional operators such as Read CSV, Read Excel, or Read XML.
Let us start with reading a simple csv file from Google Cloud Storage.
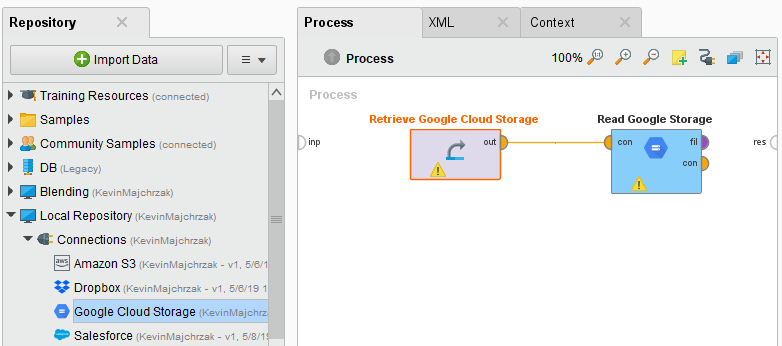
Drag a Read Google Storage operator into the Process Panel. Select your Google Cloud Services Connection for the connection entry parameter from the Connections folder of the repository you stored it in by clicking on the
button next to it: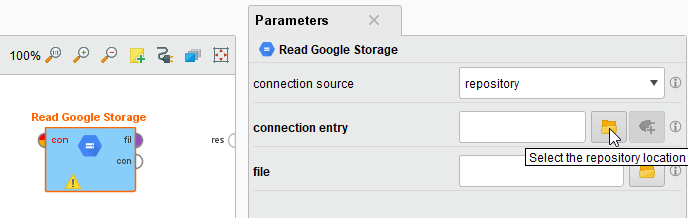
Alternatively, you can drag the Google Cloud Services Connection from the repository into the Process Panel and connect the resulting operator with the Read Google Storage operator.
Click on the file chooser button
to view the files in your Google Cloud Storage account.
Select the file that you want to load and click Open.
Note that you need storage.buckets.list permissions on the project to be able to list the buckets and use the file chooser.
If you do not have that permission, please type the path from which you want to read directly into the parameter field.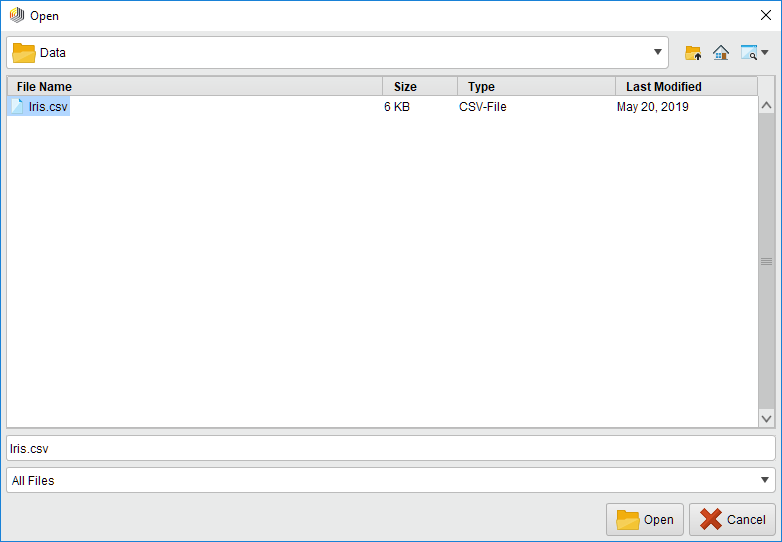
As mentioned above, the
 Read Google Storage operator does not process the contents of the specified file.
In our example, we have chosen a csv file (a comma separated values file).
This file type can be processed via the Read CSV operator.
Read Google Storage operator does not process the contents of the specified file.
In our example, we have chosen a csv file (a comma separated values file).
This file type can be processed via the Read CSV operator.Add a Read CSV operator between the
Read Google Storage operator and the result port.
You may set the parameters of the Read CSV operator - such as column separator -, depending on the format of your csv file: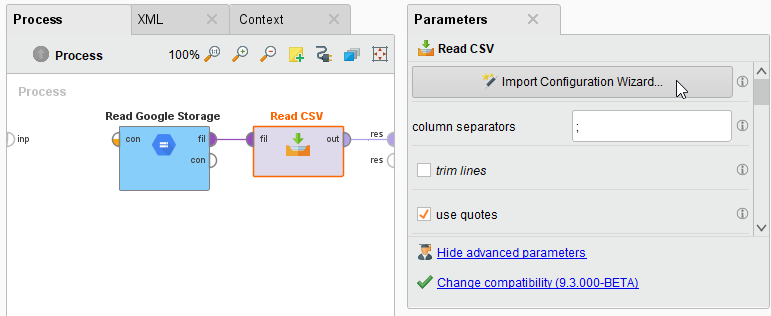
Run
 the process! In the Results perspective, you should see a table containing the rows and columns of your choosen csv file:
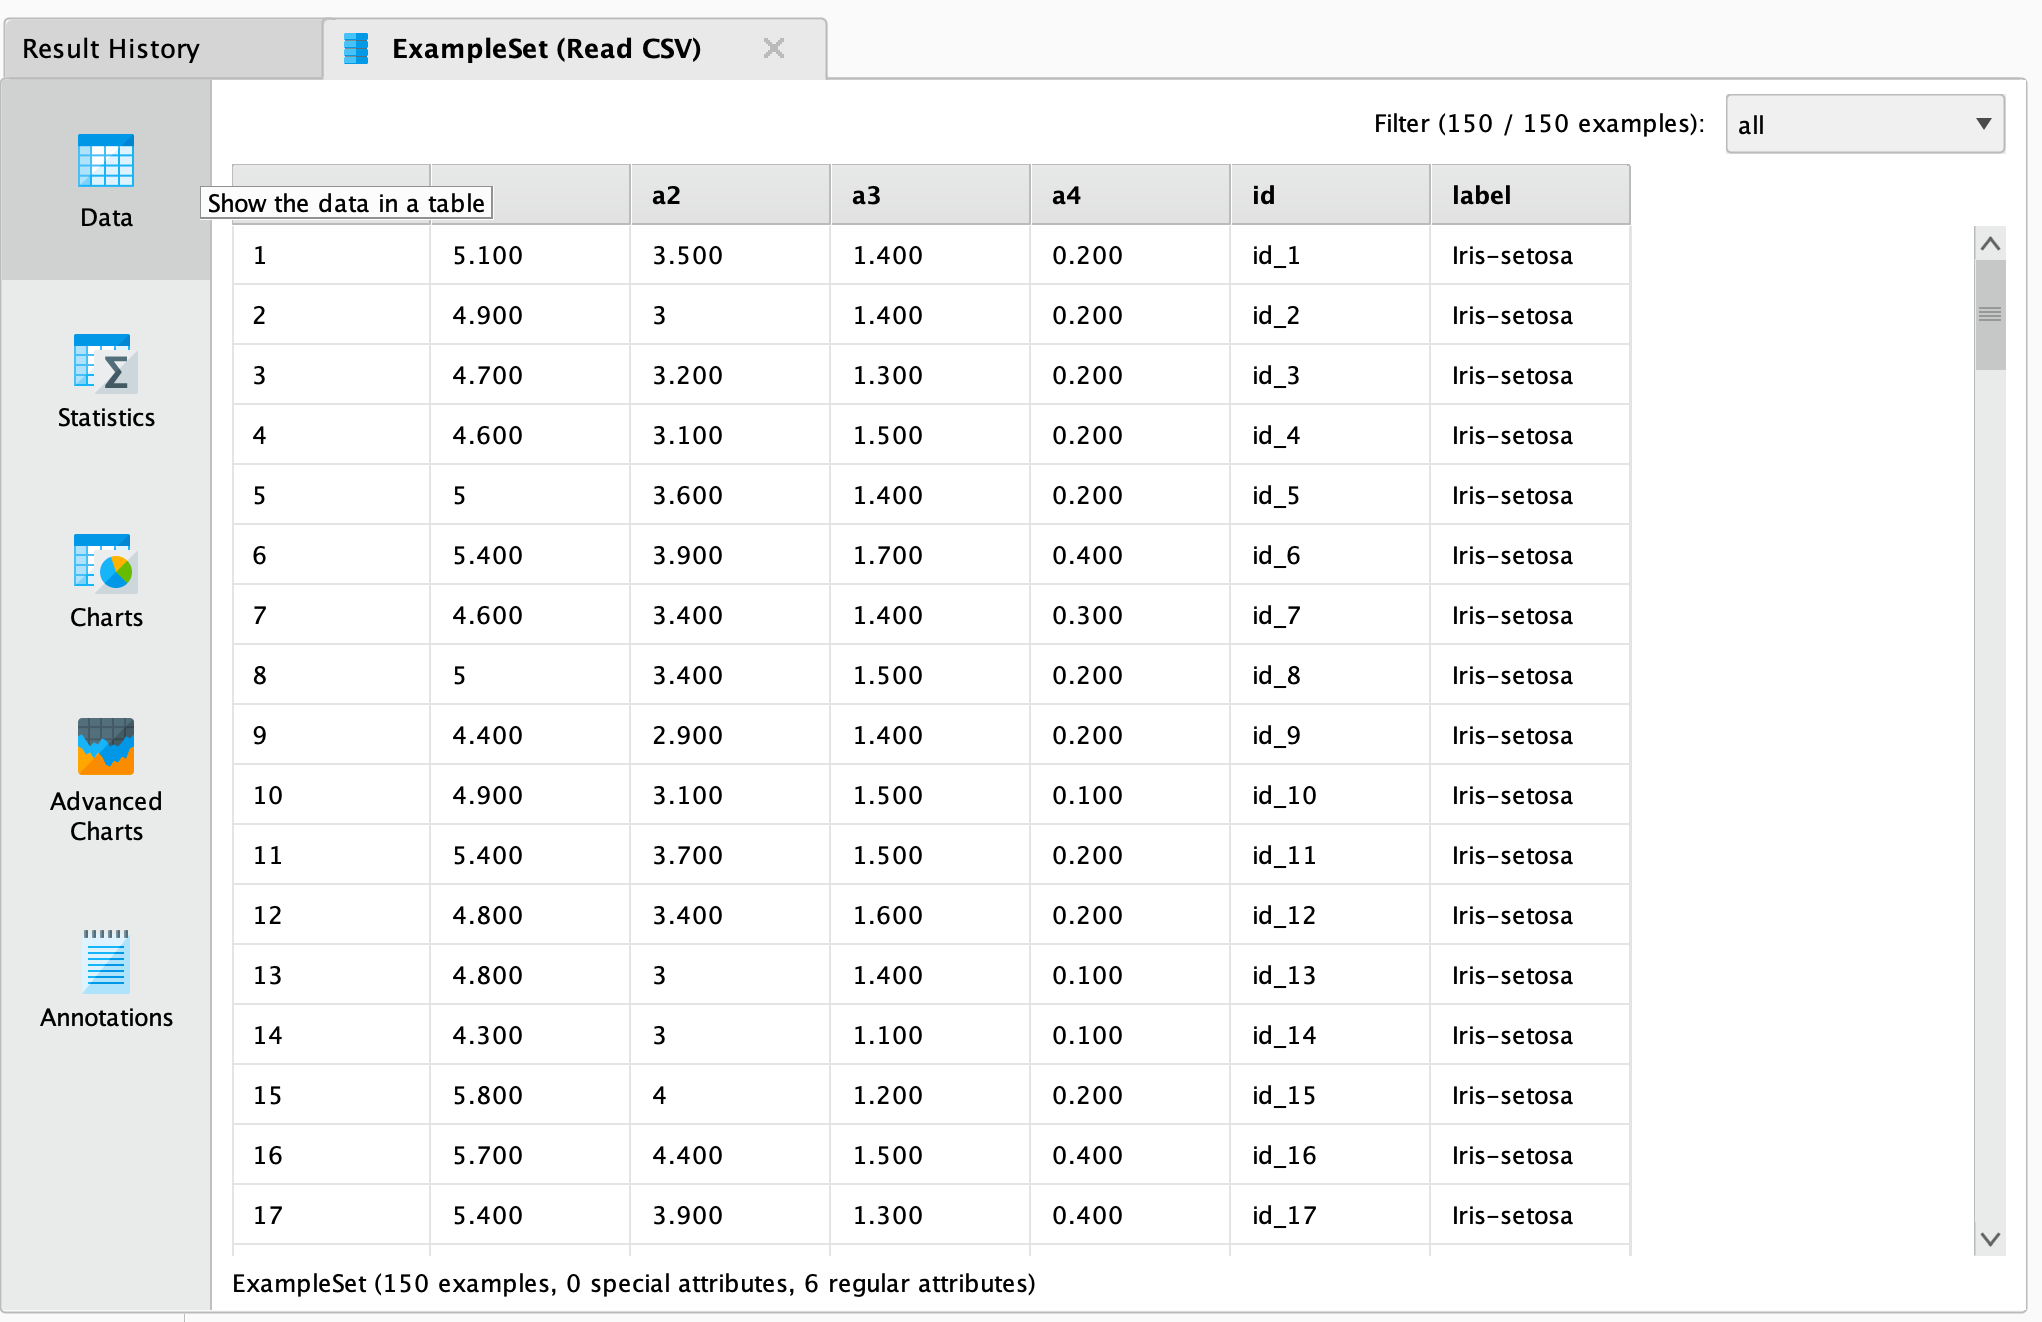
You could now use further operators to work with this document, e.g., to determine the commonness of certain events.
To write results back to Google Cloud Storage, you can use the ![]() Write Google Storage operator.
It uses the same Connection Type as the
Write Google Storage operator.
It uses the same Connection Type as the ![]() Read Google Storage operator and has a similar interface.
You can also read from a set of files in a Google Cloud Storage directory, using the
Read Google Storage operator and has a similar interface.
You can also read from a set of files in a Google Cloud Storage directory, using the ![]() Loop Google Storage operator.
For this you need to specify the connection entry and the folder, which you want to process, as well the steps of the processing loop with nested operators.
For more details read the help of the
Loop Google Storage operator.
For this you need to specify the connection entry and the folder, which you want to process, as well the steps of the processing loop with nested operators.
For more details read the help of the ![]() Loop Google Storage operator.
Loop Google Storage operator.