Configuring Radoop Proxy Security
Radoop makes it possible to connect to the Hadoop cluster via the Radoop Proxy service. This guide explains how to establish secured connections between Altair AI Studio and Radoop Proxy.
Creating a secure Radoop Proxy Connection
If you aim to establish an SSL-encrypted Radoop Proxy connection, please take the following steps:
Create SSL connection with CDP cluster import
On a secured Cloudera cluster (default) Radoop Proxy install will enable ssl. The installation automatically issues a certificate for the Proxy. This certificate is signed by the cluster root CA.
Make sure to place the cluster root CA inside your Altair AI Studio home following this guide.
To create a secure proxy connection, create a new Radoop Proxy Connection from Altair AI Studio.
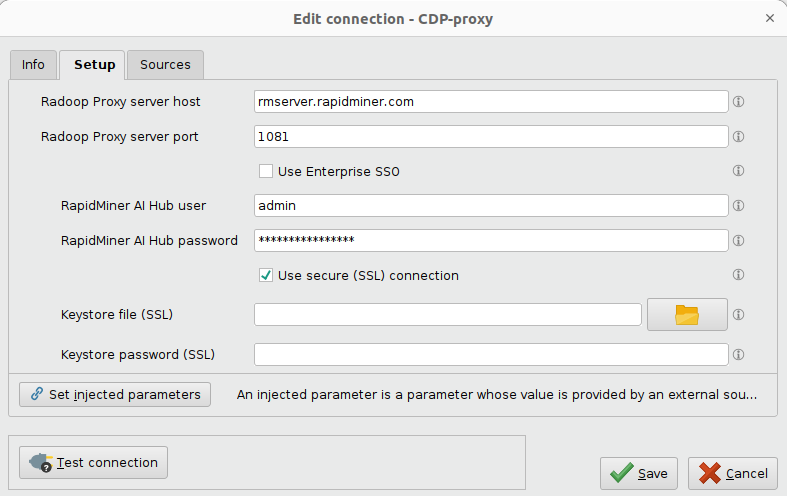
Provide the location of Radoop Proxy server and Altair AI Hub credentials, check Use SSL and leave the Keystore file and Keystore password fields empty.
Click ![]() Test connection to check whether the Radoop Proxy connection was configured correctly.
Test connection to check whether the Radoop Proxy connection was configured correctly.
Create SSL connection with a well-known certificate
Find and open the proxy configuration file, which is located at
radoop-proxy/proxy.propertiesin the Radoop Proxy installation directory by default.To enable SSL connections,
sslEnabled=trueproperty setting is required. Furthermore, you have to define the private key by uncommenting (remove#character) and setting the following lines, like:keystorePath=<keystore_file>keystorePassword=<private_keypass>
Create a new Radoop Proxy Connection from Altair AI Studio.
Provide the location of Radoop Proxy server and Altair AI Hub credentials, check Use SSL and leave the Keystore file and Keystore password fields empty.
Click ![]() Test connection to check whether the Radoop Proxy connection was configured correctly.
Test connection to check whether the Radoop Proxy connection was configured correctly.
Create SSL connection without a well-known certificate
Generate the keystores. Run the following commands (for further customization parameters, see Oracle documentation).
 keytool -genkeypair -alias server -keyalg RSA -keypass <private_keypass> -storepass <private_keypass> -keystore server-keystore.jks

 keytool -exportcert -alias server -storepass <private_keypass> -file server.cer -keystore server-keystore.jks

 keytool -importcert -v -trustcacerts -alias server -file server.cer -keystore client-trust-keystore.jks -keypass <public_keypass> -storepass <public_keypass>

 rm server.cer
Note down all passwords, as they will be needed in the following steps.
Find and open the proxy configuration file, which is located at
radoop-proxy/proxy.propertiesin the Radoop Proxy installation directory by default.To enable SSL connections,
sslEnabled=trueproperty setting is required. Furthermore, you have to define the generated private key of Radoop Proxy by uncommenting (remove#character) and setting the following lines, like:keystorePath=keystore.jkskeystorePassword=<private_keypass>
Use the same password (
<private_keypass>) that you provided in Step 1.Create a new Radoop Proxy Connection from Altair AI Studio.
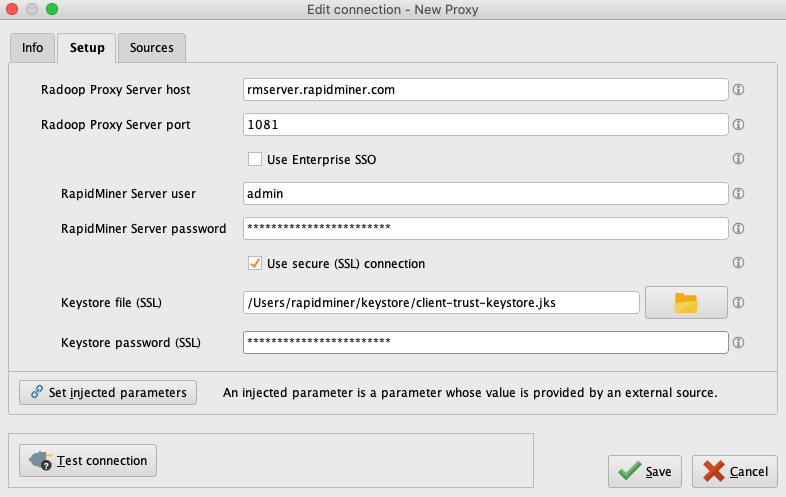
Provide the location of Radoop Proxy server and Altair AI Hub credentials. Check Use SSL, and fill in the required fields:
- Keystore file: Insert the private keystore file (
client-trust-keystore.jks) location here. - Keystore password: Type in the
<public_keypass>used in Step 1.
- Keystore file: Insert the private keystore file (
Click ![]() Test connection to check whether the Radoop Proxy connection was configured correctly.
Test connection to check whether the Radoop Proxy connection was configured correctly.